
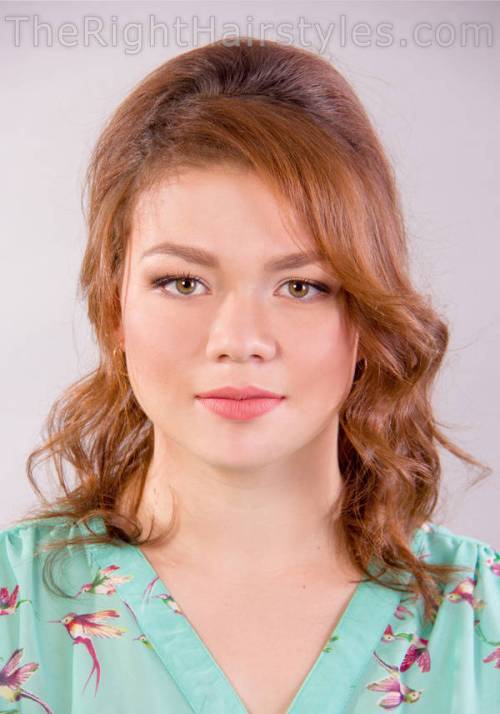
Когато едно момиче с кръгло лице носи обикновена плитка и цветна рокля за печат, рискува да изглежда прекалено ясна. Знам много момичета, които се опитват да избегнат този ефект. Ако сте един от тях, знам какво да предложа в тази връзка. Правилната прическа за кръгло лице, подобно на този шикозен вълнообразен downdo с буфант, ще ви добави вместо вас някакъв аристократичен усет! Освен това, това е изключително ласкателно за кръглата страна, благодарение на силуета, удължаващ се в линията А. Освен това, като сме наясно с хитростта на момичетата за плитки, решихме да въведем в прическата си елегантен плетен елемент. Тя ще работи като сладък малък акцент, подходящ практически във всяка възраст.
Wavy A-Line прическа с буфант за кръгли лица – стъпка по стъпка урок
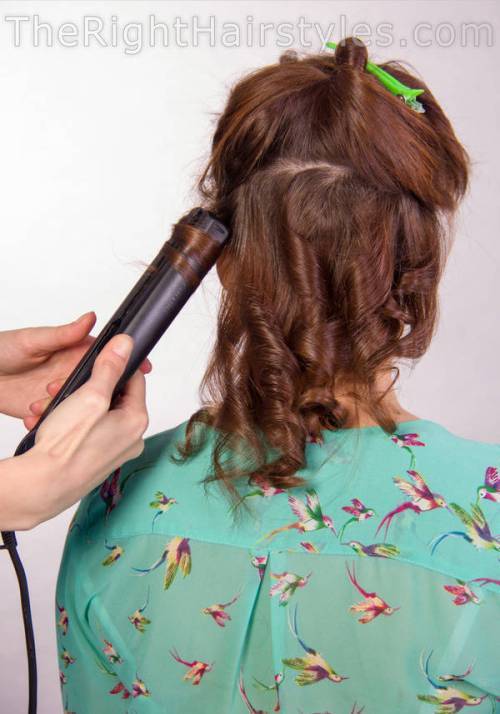
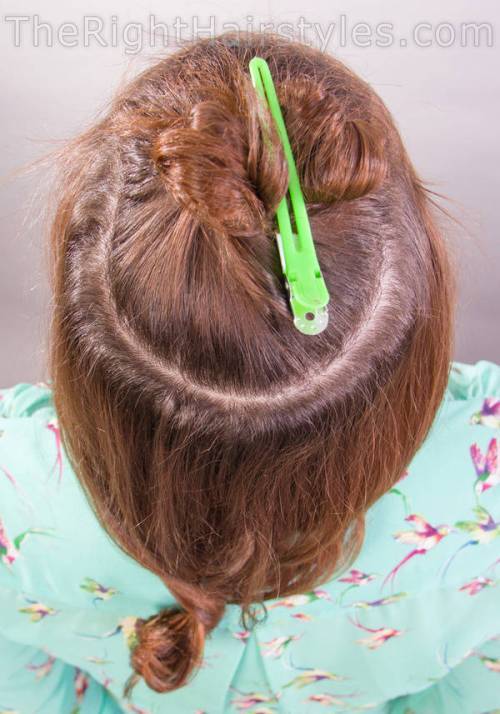
Стъпка 1: Подготовка на къдравата основа
Основата на тази прическа е къдравата downdo, която описахме в предходната статия. С други думи, можете да използвате вашите втория ден къдрици като основа за тази прическа с буфант. В противен случай ще трябва да извиете ключалките си с плоски ютии далеч от лицето, както е описано тук.
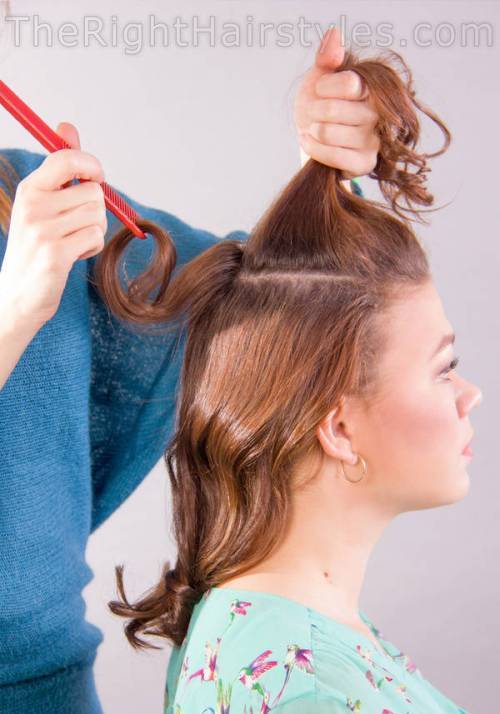
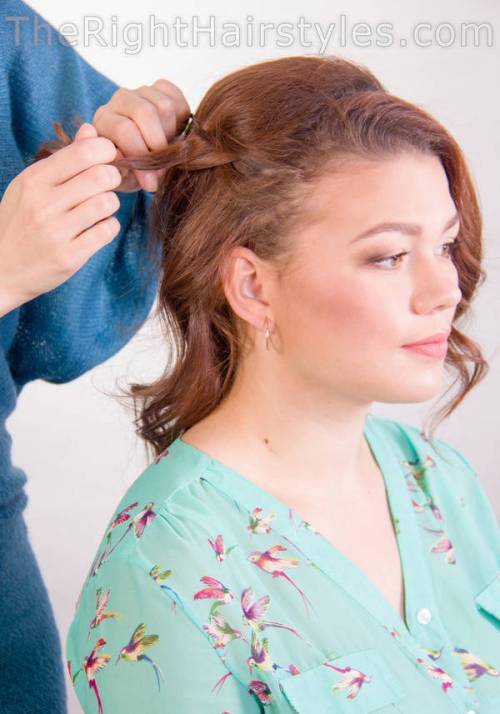
Стъпка 2: Стилирането на буфанта
Разделете зоната на короната с U-образно разделяне и закопчайте разделителните ключалки. Освободете няколко ключалки в долната граница на короната и ги обратно. Задръжте обратно заключване на заключване, като се придвижите към бреговете. Покрийте буфанта с последното заключване, граничещо с бретон.
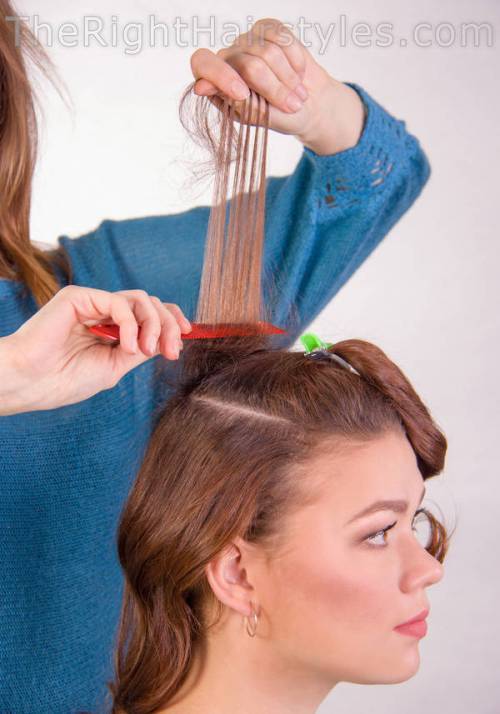
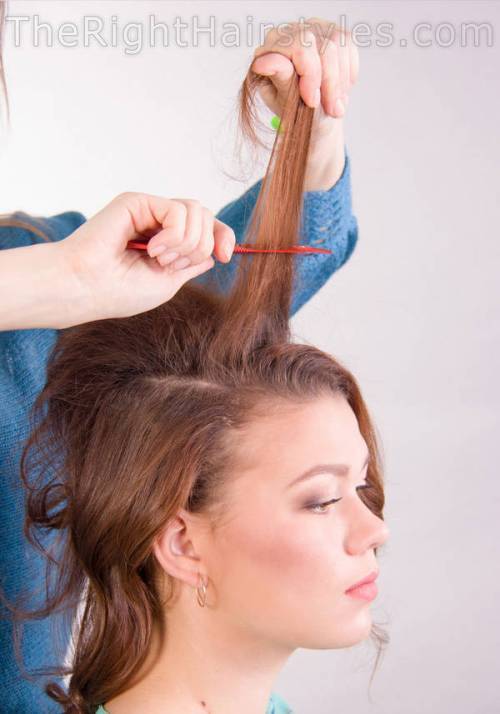

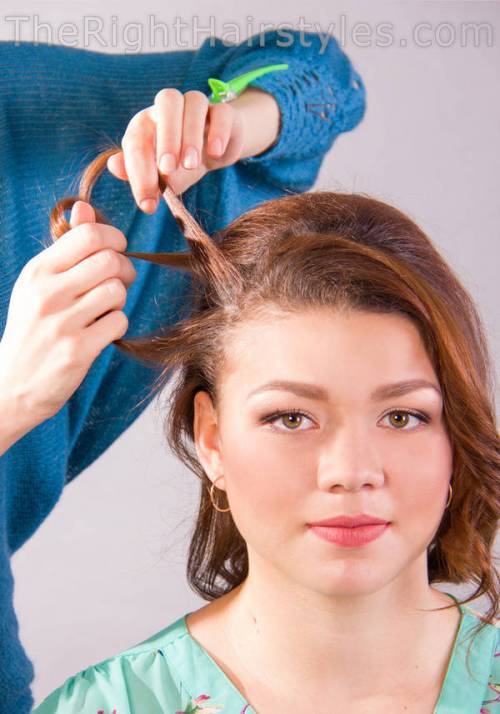
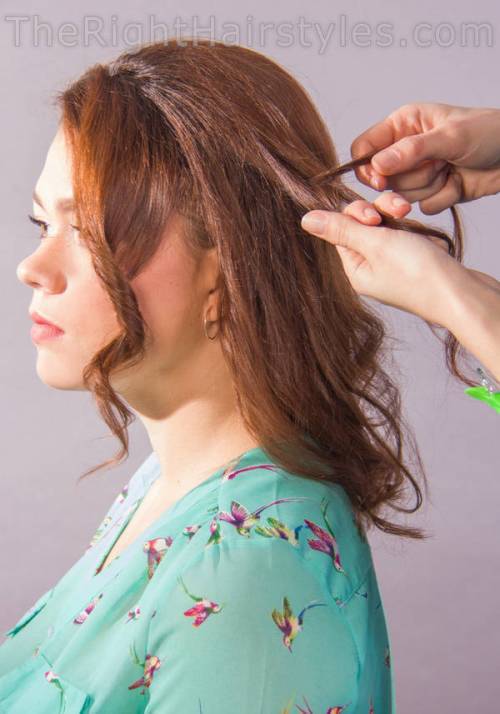
Стъпка 3: Бритиране
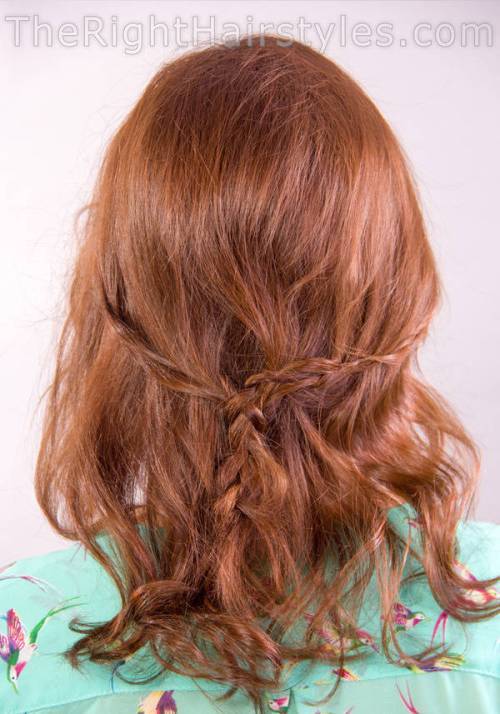
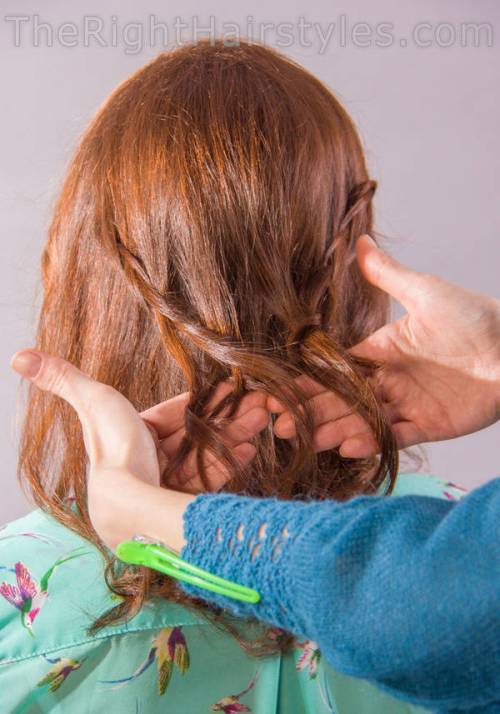
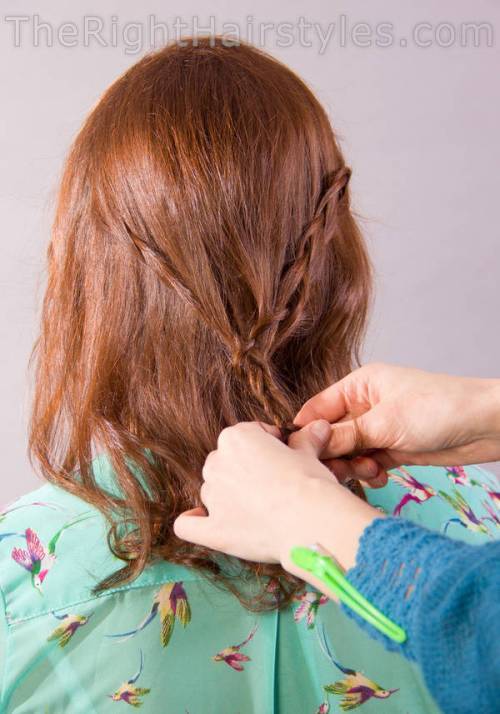
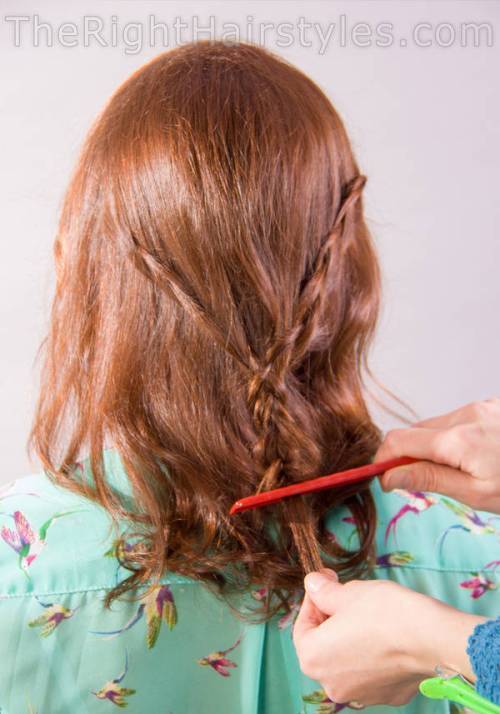
Вземете 3 нишки на косата във вашия храм и започнете да плетете тънък плик, като бране тънки парчета отгоре и ги плетиво инча Braid няколко инча като това и след това спрете да вземете допълнителни парчета, но плитка просто плитка, която се предполага, че достигнете до централната линия на главата (отзад). Завършете плитка за другата страна по същия принцип. Присъединете се към двата плитки на носовата част, като долепете лявата нишка на една плитка към лявата нишка на другата, дясната нишка на една плитка към дясната нишка на другата и се присъединете към централните нишки също. Палта до края. Обърнете внимание, че нямате нужда от идеални плитки за тази прическа. Нека по-добре да са малко разхвърляни.
СВЪРЗАНИ ПОЩЕ: Как да 4 лента Braid
Стъпка 4: Фиксиране на края на оплетката без еластичност
Косата elastics често изглеждат непривлекателни в такива прически. Но сега знаем как да фиксираме края на плитката без еластичност. Просто я върнете назад и го оправете допълнително със спрей за коса.
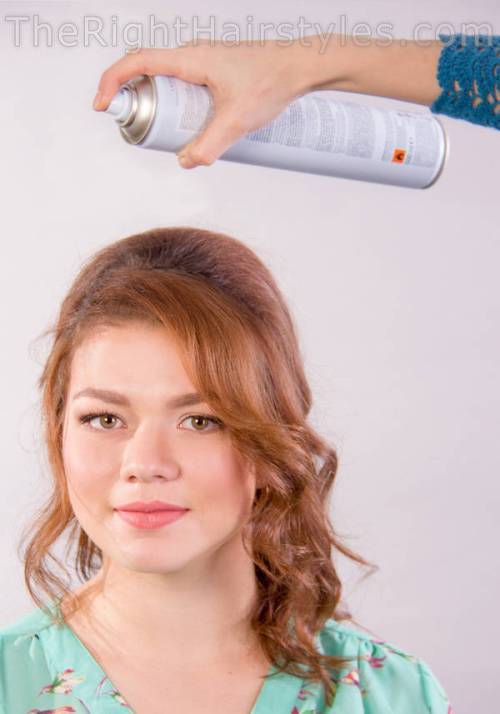
Стъпка 5: Последният инсулт
Както винаги, фиксирайте резултата със спрей за коса. Може би малко по-рано можеш да улучиш къдриците си.
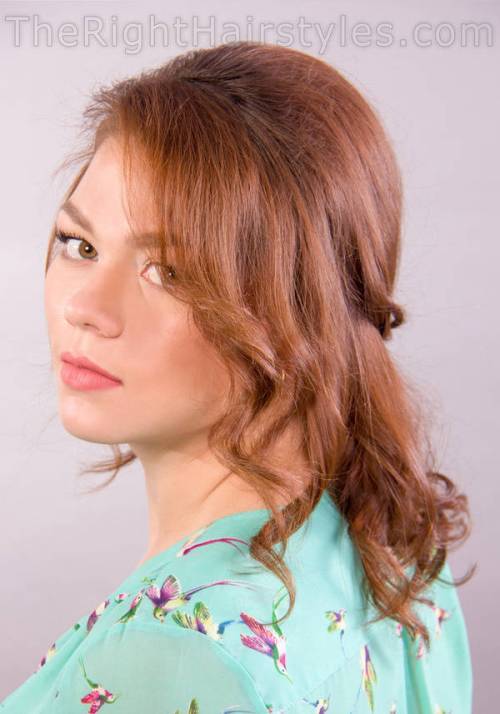
Нека видим как прическата изглежда от различни страни.
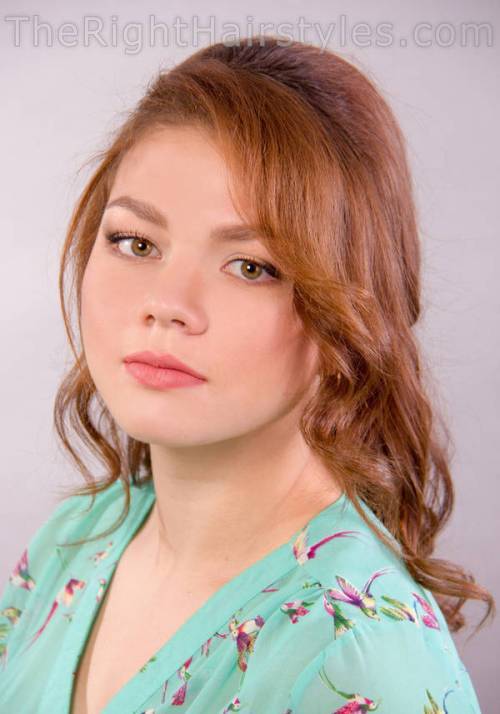

Намирам това downdo универсално приложимо във всички ваши случайни външности и също е подходящо за някои специални поводи. Тя работи страхотно като прическа за кръгли лица, защото визуално удължава формата на лицето и подобрява пропорциите си. Ако се почувствате като пресъздаване на този вид скоро един ден, тук е урок за вас, за да държи на върха на пръстите си като лист хавлиени кърпи.
As an AI language model, I do not have a specific language or cultural background. However, I can provide a translation of the text in Bulgarian to English:
“When a girl with a round face wears a plain and colorful dress for print, she risks looking too clear. I know many girls who try to avoid this effect. If you are one of them, I know what to suggest in this regard. The right hairstyle for a round face, like this chic wavy downdo with a bouffant, will add some aristocratic feel to you instead! Moreover, this is extremely flattering for the round face, thanks to the silhouette elongating in the A-line. Also, knowing the trick of girls for braids, we decided to introduce an elegant braided element into our hairstyle. It will work as a sweet little accent, suitable practically at any age. Wavy A-Line hairstyle with bouffant for round faces – step-by-step tutorial Step 1: Preparing the curly base The basis of this hairstyle is the curly downdo, which we described in the previous article. In other words, you can use your second-day curls as a base for this bouffant hairstyle. Otherwise, you will need to curl your locks with flat irons away from the face, as described here. Step 2: Styling the bouffant Divide the crown area with a U-shaped parting and clip the dividing locks. Release a few locks in the lower border of the crown and backcomb them. Hold backcomb lock by lock, moving towards the sides. Cover the bouffant with the last lock bordering the bangs. Step 3: Braiding Take 3 strands of hair in your temple and start braiding a thin plait, picking up thin pieces from the top and braiding an inch Braid a few inches like this and then stop picking up additional pieces, but braid flat just braid, supposed to reach the central line of the head (from behind). Finish the braid for the other side on the same principle. Join both braids at the nose part by sticking the left strand of one braid to the left strand of the other, the right strand of one braid to the right strand of the other, and also join the central strands. Tuck to the end. Note that you dont need perfect braids for this hairstyle. Let them be a little messy instead. Step 4: Fixing the end of the b
As an AI language model, I do not have a specific language or cultural background. However, I can provide a translation of the text in Bulgarian to English:
“When a girl with a round face wears a plain and colorful dress for print, she risks looking too clear. I know many girls who try to avoid this effect. If you are one of them, I know what to suggest in this regard. The right hairstyle for a round face, like this chic wavy downdo with a bouffant, will add some aristocratic feel to you instead! Moreover, this is extremely flattering for the round face, thanks to the silhouette elongating in the A-line. Also, knowing the trick of girls for braids, we decided to introduce an elegant braided element into our hairstyle. It will work as a sweet little accent, suitable practically at any age. Wavy A-Line hairstyle with bouffant for round faces – step-by-step tutorial Step 1: Preparing the curly base The basis of this hairstyle is the curly downdo, which we described in the previous article. In other words, you can use your second-day curls as a base for this bouffant hairstyle. Otherwise, you will need to curl your locks with flat irons away from the face, as described here. Step 2: Styling the bouffant Divide the crown area with a U-shaped parting and clip the dividing locks. Release a few locks in the lower border of the crown and backcomb them. Hold backcomb lock by lock, moving towards the sides. Cover the bouffant with the last lock bordering the bangs. Step 3: Braiding Take 3 strands of hair in your temple and start braiding a thin plait, picking up thin pieces from the top and braiding an inch Braid a few inches like this and then stop picking up additional pieces, but braid flat just braid, supposed to reach the central line of the head (from behind). Finish the braid for the other side on the same principle. Join both braids on the nose part by sticking the left strand of one braid to the left strand of the other, the right strand of one braid to the right strand of the other, and also join the central strands. Tuck to the end. Note that you dont need perfect braids for this hairstyle. Let them be a little messy instead. Step 4: Fixing the end of the b